Daisypath - Personal pictureDaisypath Happy Birthday tickers
Daisypath - Personal pictureDaisypath Anniversary tickers

..:: Selingan Cinta::..

Flying BeeFlying BeeFlying Bee Flying Bee Flying BeeFlying BeeFlying BeeFlying BeeFlying Bee Flying BeeFlying BeeFlying BeeFlying Bee
Showing posts with label Project. Show all posts

Sunday, 19 January 2014

MY Design for Subject Publicity & Event Management


masa part 4 ni kan..
baby n team kena buat 1 small event
why small event???
sebabnya masa part 5 nnt 1 kelas kena buat 1 event yang agak besar
so nie macam permulaannya.. walaupon sebelum nie kami dah pernah buat event besar as 1 batch..
its ok..

1 kelas dibahagikan kepada few groups..
1 kumpulan tu ada 5 orang..
and kena propose few events each group..
dalam banyak banyak event yang antara kami propose.
akhirnya kami stick pada 1 event..
"CHILDREN DAY CAMP"

disebabkan baby ketua projeknya...
dan baby mastermindnya..
diorang lantik baby jadi CEO of the company..
ala.. virtual company..
tak caya???
nie la business card baby ok...


kelas tak business card tu??
i design sendiri ok~!!
macam biasa curi tampal n edit sana sini kasi santek..
haha.. i bukan budak art ok~!! so.. x heran la biasa2 jerrr.
janji hadoo...

so.. baby nak share few of my design yang berkaitan dengan event nie..
Banner
Bunting
Name Tag
Label

Invitation Card
Invitation Card (Back)

design utk Button Badge, alas cawan & kipas
so ni antara design yang baby buat..
ala.. newbie je..
tak pandai pon bab design design nie..
tapi dari habis duit bayar orang semata... baik baby dok godam je kan..
heee.

btw.. event nie cuma jadi mock-up event.. 
sebab kekangan masa...
if ada yang nak jadikan ia 1 event reality.. let me know..
i love to hear n collaborate with u guyz.. 



Love,
BabyNurul Ain

Thursday, 6 June 2013

Hot Header


bila kerajinan terserlah..
inilah hasilnya..


cantik tak???


Love,
BabyNurul Ain
Tuesday, 6 November 2012

Tutorial Flower


Flowers are definitely a crafting staple. They seem to be that one embellishment that you can pop onto just about anything to add a little interest, drama, or pop of color. So I never tire of coming up with new ways to create them!
flowers_singleflower
I would be willing to bet that you would not be able to guess which punch I used to create the above flower. Any guesses? It's the scalloped square (Square-A-Licious) squeeze punch. I came up with this technique on accident, and I have to say it is quite addicting. This folding technique creates wonderful dimension without using any foam adhesive, etc. Here's how you do it:
1. Punch a scalloped square and mark the center (just eyeball it) with a pencil. Cut from the center of each side toward the center, stopping shy of the center mark.
2. Fold in each cut as shown, folding from the center up to the first scallop. Repeat for all cuts.
flowers_bluedemo1
3. Once folded, turn over. The folded pieces add the dimension. Snip off the middle scallop from each petal with scissors.
flowers_bluedemo2
4. Repeat steps to create second flower. Fan and adhere at centers. Top with brad or button. Here I have also included a spiraled center by spiral-cutting a Seal of Approval squeeze punch and rolling up to adhere.
flowers_zoom
Play around with layering different sizes and colors. Once you get this technique down, you can try a fun variation using decorative corner punches. Simply cut out a 2 inch square of cardstock and deco-punch all corners. Fold the same way as above, but first snip off the corners from each cut. This avoids these corners showing through your decorative punched design. Repeat with a second flower and layer for dimension.
flowers_pinkdemo
I knew a wreath would be a fun way to display my flowers, but I couldn't find a wreath base around the house. Instead I cut out a base of chipboard by tracing and cutting circles onto chipboard using the Super Sized Circles template and wrapped with thin twine. The flowers were hot-glued to secure.


EditingMySpace.com - Valentines Day Dividers


BabyNurul Ain

Tutorial flower ornaments


I was trying to think of other ways to make easy ornaments from paper and created these last night while watching CSI reruns. They're made from cheap computer paper. How to:

1. Cut one piece of 8 1/2" x 11" paper into 1" strips (oriented landscape so you end up with 11 strips).

2. Stack them and staple them once in the center, then fold the stack in half to form a little book. (If the strips are too long for your stapler to reach the center, either trim them a bit shorter or swing your stapler open and staple the stack on a magazine or cutting mat. Then bend the staple closed.)

3. Put a little piece of double-stick tape at the tip of the first "page." Then bend it inward toward the center and stick it down. Repeat for every "page" until you have a circular flower shape.

4. Hang with invisible thread. (Yeah, there is such a thing! You can buy clear thread at a fabric store.) 


credit : lhttp://howaboutorange.blogspot.com/2008/12/paper-flower-ornaments.html

EditingMySpace.com - Valentines Day Dividers


BabyNurul Ain

Tutorial Crepe Paper Flower


Pinned Image


EditingMySpace.com - Valentines Day Dividers


BabyNurul Ain

Tutorial Ornaments Pattern


Pinned Image


EditingMySpace.com - Valentines Day Dividers


BabyNurul Ain

Tutorial Rose 1


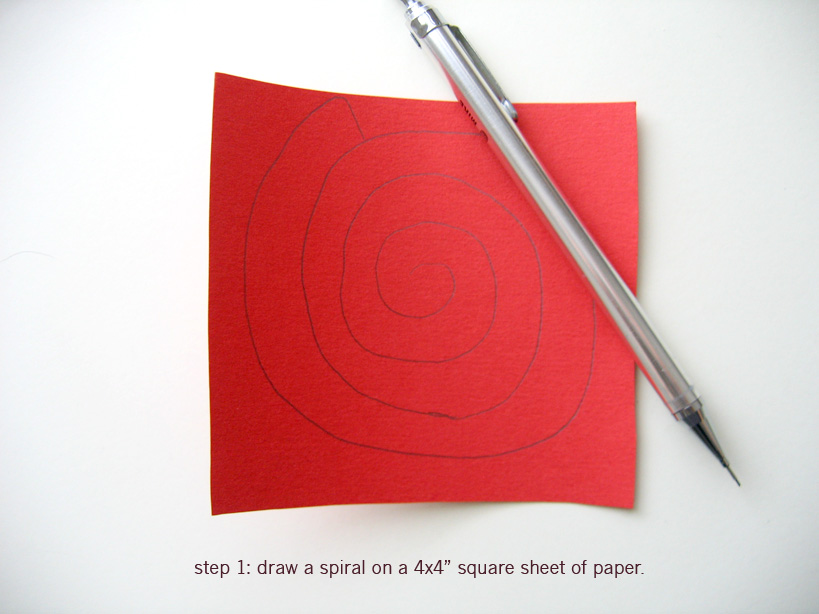
Step 1: Draw a spiral on a 4x4" square sheet of paper
Paper flower tutorial: step 1

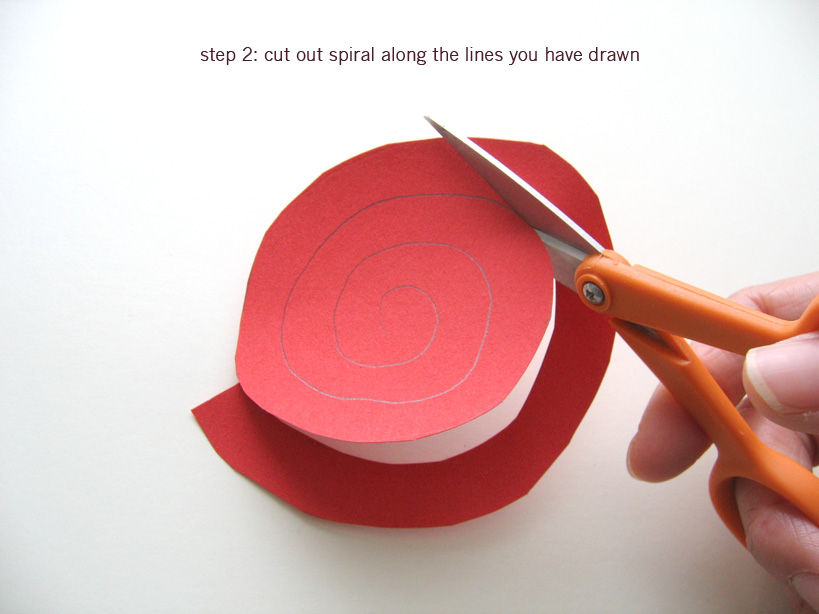
Step 2: Cut out spiral along lines you have drawn
Paper flower tutorial: step 2

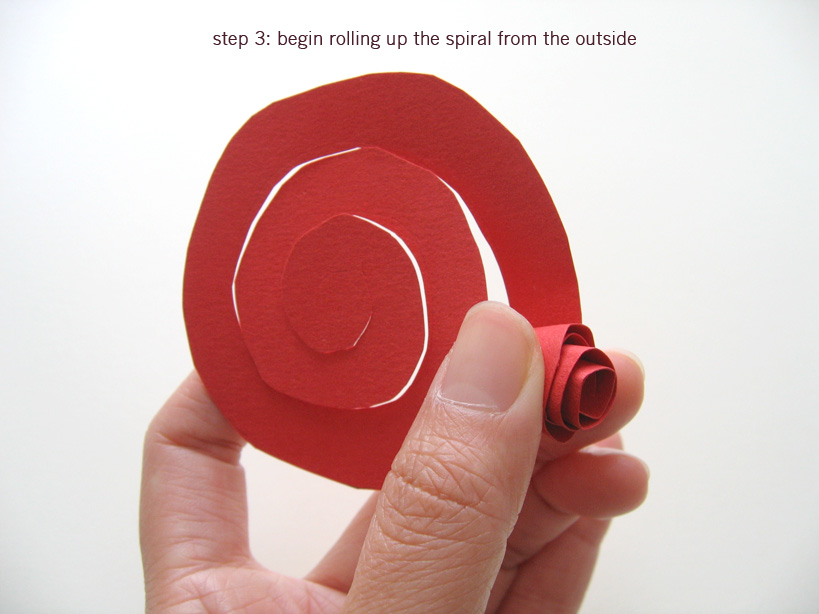
Step 3: Begin rolling up the spiral from the outside
Paper flower tutorial: step 3

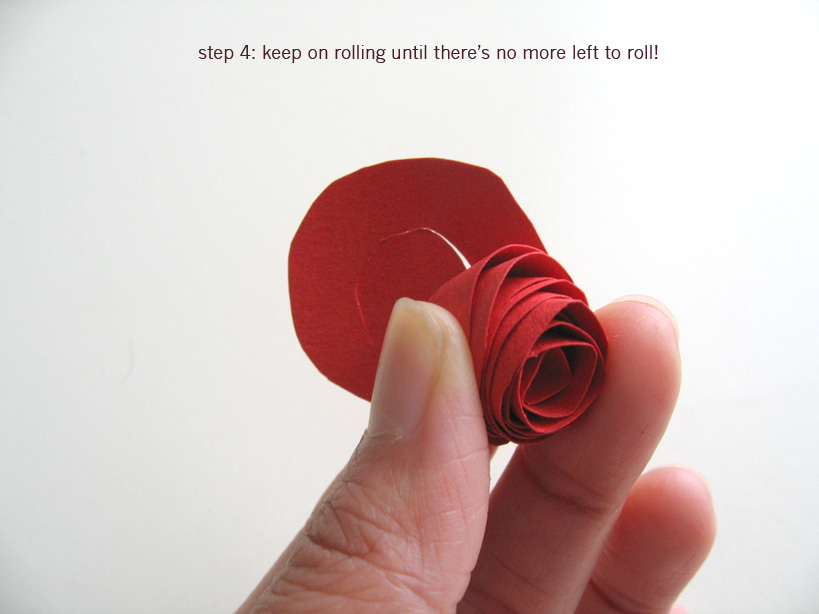
Step 4: Keep on rolling until there's no more left to roll
Paper flower tutorial: step 4

Step 5: You're done!
Paper flower tutorial: done!


EditingMySpace.com - Valentines Day Dividers


BabyNurul Ain

Friday, 14 September 2012

Carefree Promo


bila ku kenang ku renung gambar wajahmu..
kisah yang lalu tak akan berulang lagi..
ini cerita kisah yang lama..
mengapakah itu disebut lagi..

ceh ceh ceh.. menyanyi la pulakk..
hehehe.

ok Guyz.. Gud news..
sape yang pandai buat video?
minat kumpulan Carefree?
wanna be a part of his VIP fans..
come to their showcase and events??

just u have to make a CREATIVE WISHES VIDEO to CAREFREE
support them in their comeback.
and send the video together with Your Name and Location
to jazzylooi68@gmail.com

then wait for the feedback from them..
senang je kan..

nak contoh??
nie contoh dia....


EditingMySpace.com - Valentines Day Dividers


BabyNurul Ain

Monday, 19 December 2011

Flash - Shape Twin


Adobe Flash Player : Action Script 2
Size: 1024 x 768 pixel

..:: Tukar Huruf ::..

1. tulis Text
2. select kat keyframe 20.
3. right click -> insert key
4. right click -> insert keyframe
5. kat keyframe 20: tukar Text
6. keyframe 1: right click -> break apart (2x)
7. keyframe 20: right click -> break apart (2x)
8. keyframe 1: propertise (kotak kat bawah)
          tukar tween -> shape
          tukar blend ->angular

DONE !!

p/s: sowi.. x sempat nak buat tutorial bergambar.. bz skit.. ni pon buat post dalam kelas.. heeee.. sambil belajar, kita kongsi ilmu.. hehehe.. once baby dh free skit.. baby buatkan tutorial bergambar ye..


BabyNurul Ain

Flash - Gerakan Orang


Guna Adobe Flash Player

open file : Action Script 2
size : 1024 x 768 pixel

kali nie nak buat orang bergerak

1. Lukis Orang Lidi ( 1 org 1 layer)
2. Double clik kat objek -> f8 (tukarkan ke symbol)
* F8 : klik kat Graphic -> Ok
3. gerakkan bulat center (bulat kat tgh2 objek) dan alihkan ke bahagian sambungan badan supaya bila bergerak nanti... anggota badan tak terputus
4. Filih keyframe.. Select all layout dan insert keyframe.
5. gerakkan objek.

ulang step 4 & 5 untuk setiap pergerakan..

* 1 objek 1 layout

p/s: sowi guyz.. lom ade masa nak buat tutorial bergambar.. nnt bila baby ade masa... baby akan update yang bergambar punya ok..

BabyNurul Ain